Showing posts sorted by date for query Masculine. Sort by relevance Show all posts

Thursday, July 20, 2023

Tonic Studios : A Lifetime of Adventure


Hi crafters, 
Today I am bringing you samples made with the Tonic Studios Craft Kit: A Lifetime of Adventure.
This is a great little kit, as it allows you to create not only a mini-album, but some amazing mixed-media cards. 
Below are some ways in which you can use the items available in this kit. This post includes affiliate links, and links to helpful unboxing and tutorial videos on my Youtube channel. 
Enjoy!
This is the cover of the adorable 5x5".25" mini album. I used the 6"x6" Craft Perfect Paper collection: The Blue Hues. This collection includes a total of 24 papers in 4 colors: Imperial Blue, Cobalt Velour, Blue Obsidian, and Turkish Turquoise. It is a mirror card collection full of shine and gorgeous color payoff. The Cover of my book includes the Imperial Blue color (Sail Die Cut, Sentiment Strip), along with Turkish Turquoise (Small banners on sentiments). The Turquoise Lake glitter paper was also included in the kit.

Here is the open book. It contains 4 pages with pockets. These are attached with Marigold Yellow twine. On the knotted twine is one element from this kit: A luggage tag, cut out of the gorgeous Turkish Turquoise mirror card. I used the same color mirror card on the pocket to the right. This is also inlaid with the small pieces from the opposing page. All pages also have matching inserts, which are topped with different sized tabs. They are an adorable touch to this small book! 

Here is another look at this mini album. The page colors alternate using both Teal Blue and Ocean Blue card, each containing a picture frame. The base, and white matting layers are made with 300gsm cardstock, and the remaining layers are made with Cream, and Ginger Pie card from the kit. I used sentiments and images from the kit, which I stamped and heat-embossed onto the cream card with coordinating colors. The small tag with sailboats is also topped with the included stone drop in Lady Liberty. Its sandy texture is perfect for this tiny ocean-like scene.


Here is a close-up of the small tags I created to add to the small pockets. They are stamped with a sailboat, airplanes, trail, and heart. All of the images are part of the stamp set in this kit.

Affiliate links will allow you to shop and sign up for the monthly kit subscription, or purchase a one-off kit. No commitments, no hassle!

US: https://shrsl.com/43fkv
 
UK: https://shrsl.com/45g9u

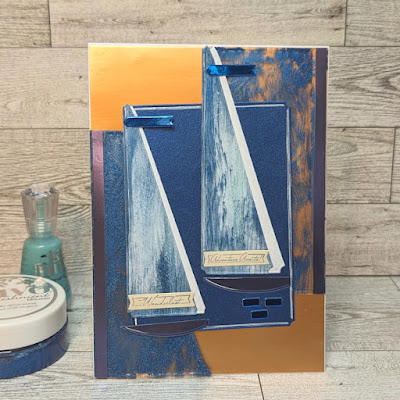
I also had some fun with the Nuvo Embellishment Mousse from this kit. I used it in two ways: on vellum, as seen on the easel card, and on the acetate carrier sheet containing the dies in this kit, as seen on the sailboat card. This is yet another way to expand your options in card-making. 


Finished result of Circle Easel card with Nuvo Mousse.


Masculine card made with Nuvo Mousse, Sand Drops, and Specialty papers.
Mousse and Drops applied to Acetate sheet.


Saturday, May 30, 2020

DT Project for Crafter's Castle with Tonic Studios Bouquets and Banners Wonderfall Dies


Hi crafty friends,
This month I am collaborating as a Design Team Member with Crafter's Castle. Please stop by this blog and participate in monthly challenges. All craft levels as well as craft types are welcome, and every month there is a random winner selected to receive a prize. International entries are welcome!
This month's challenge Prize is Another Cup of Coffee Digital Kit from Taylormadecards4u.

 Today, you will see a sampling of projects I have made with this Digital Paper Collection, as well as my Tonic Studios and Tim Holtz products.


My first project was a masculine Waterfall Card, made this using the Tonic Studios Bouquets and Banners Wonderfall Dies This allowed me to place several images from the collection on the front of this interactive card.

I also used the beautifully masculine coffee-themed paper that I cut using a beveled edge die from Tonic Studios.

Here you can see the mechanism at work, and how I used one of the many images to decorate the waterfall created by the dies. The papers have a lovely vintage feel that I layered with other cream and copper colored papers from my stash.


Inside the card, I also used the sentiment: Just for You, on a banner cut with the same dies. All of the edges were distressed using Tim Holtz Distress ink from Ranger in Ground Espresso. I love the masculine feel of this card, and it's perfect for Father's Day!

One of the fun things about using Digital papers, is the ability to manipulate the size of the images. For this, all you need is a basic home printer. This is what I did to make this very feminine card, using one of the images featuring a young girl carrying a tray of coffee cups and carafe.


I used flowers from my stash, as well as a pink ribbon to emulate the one worn by the small girl. I also topped off her hair with s tiny flower embellishment, and created a coffee cup that I painted to match using Tim Holtz Iced Spruce ink and Nuvo Creative Pens in Pink colors. The sentiment is a stamp that reads: Brewed with Love. The doily shape is reminiscent of a place setting, and I used a Crafter's Companion die to cut this out of a latte colored paper.


For my last, and favorite card, I used images from the collection as a mixed-media collage on a triptych style card. This was a lot of fun to do, as I was able to incorporate lots of textures and layers, giving me a very dimensional result with beautiful elements interspersed throughout.
On the front, I increased the image size, and for fun, I also incorporated the smaller version of the girl with roses, as it originally appeared in the collection. The added tags with coffee plant motifs and vintage ads are all from the same paper collection.


Here you can also see how I layered machine stitching, corrugated paper and ephemera from Tim Holtz. A double bow made of twine topped with a vintage button finished the front of my card nicely. 

Here you see the rest of the card, with several playful layers of the lovely images in this collection, wooden butterflies and hummingbird. The entire scene is like a garden. Just like the one in which my own grandmother used to grow her own coffee.


Here is a closed look at the piecing. All papers are distressed and inked with Gesso and Espresso Ink.

Materials Used:


I hope that you have enjoyed this project share, and appreciate your time today as I have shown you some versatile examples of projects you can make as well.

My fellow Crafty Design Team members have made some wonderful projects here:

Priya (Creative Motifs) https://youtu.be/Cx9FdEq1FB8 L J (Create With Squdge Craft) https://youtu.be/2ZMcVNZ4r9g Jeanie Ellis https://youtu.be/Rmqvn-ITJC0 Taylormadecards4: https://youtu.be/KaNGZAqwD_4 Deborah Jenkins - https://youtu.be/UXr4wvcs2KU

Feel free to watch the video, and please use the links added for your convenience to help this channel grow and bring you future giveaways!
As always, I hope that you can
 Be inspired, Be Blessed!
~Raquel

Disclosure: Affiliate links are provided in this post.  As an affiliate for Paints and Glitter , Paints and Glitter receives a small commission whenever these links are used.  Note: These links are FREE for you to use.  All opinions and reviews are that of my own.  I only recommend products that I use for both business and personal reasons, and from reputable companies that I trust.  Thanks for your support!


Monday, October 29, 2018

Masculine Cards in Fall Colors


Hi friends,
One of the greatest challenges people ask me about is: "How to make masculine themed cards?"
Well, I have to confess that I absolutely love creating masculine cards, so I have gathered some quick tips fror you that might help!
I like to follow basic rules of design, but above all, I love to add texture!! 
These are created using Graphic45 papers, with rich yet subtle colors...
My recommendation is that you look at the papers as if you were selecting an outfit for the "Man in your life"...all kidding aside, this works!
Above, you see I selected a "pin-stripe shirt" base paper, followed by a music sheet embossed "tie".
A black "slacks" paper is embossed in wood grain, and the olive green burlap ribbon could very well be a belt. Now do you see it?


Then it's time to accessorize! 
I topped this card with two elements that had to convey my message. This card is for a pastor and worship leader, so the microphone and Bible were must-haves. In order to make sure these elements were not competing against each other, I added the microphone on a shaped tag, and topped it off with a metal brad (can you see a cuff link there?) and a black floss bow. 

Here is a closeup of that microphone and Bible. Both were stamped with black ink. The Microphone was also heat-embossed. This changed it to a copper finish, and oxide ink was used throughout.
The Praise stamp finished my card.


This card was a bit easier, but the same elements are at play. I wanted to incorporate the same Bible stamp, but this time I placed it on a flat surface. (As if on a desk). Once I had this element, I created the background as I would decorate a festive wall display.
Again, adding texture is key, so I used banner dies with a stitched edge, and also embossed the background paper with a honey-comb shape. Oxide ink helped to make this stand out. To repeat the same element in the card and still keep it subtle,  I added the banner tag pieces in the same honey-comb shape. 

The sentiment was the centerpiece of this card, so I added it with two small button brads at the center of my card, and used the same olive burlap ribbon. 
I was quite pleased with both of these cards. The neutral color pallete made it easier to concentrate on adding texture, and I loved using the inks and embossing to give them special touches here and there.

What I used: 
Graphic45, Making Memories, 7Gypsies, Ranger Oxide ink, Sheena Douglass, Dove Art Studios for C.C. Designs, BoBunny, Cuttlebug, Spellbinders, & others
I hope that this post has been helpful to you. If so, don't forget to leave a comment and visit my youtube page for more inspiration!
Be inspired, Be Blessed!
Raquel


Thursday, July 12, 2018

Mariner Mini Album using Tonic Memory Book Dies, and Cricut Design Space

Hi friends! I hope this post finds you well. If you are looking for inspiration, I hope you find it here with this beautiful mini album! I will share with you all of the gorgeous details added on every page. Let's begin!
On the cover I added images to give the introduction to our Nautical Journey!


The teddy bear is dressed with his own little Navy hat, and behind him I added the layered boat with details in Glossy Accents, glitter, and a banner I customized to show off the baby's name. The helm tops it off with a tiny red brad in the center. The spine of the book is in corrugated cardboard for a masculine touch.


Page one opens with an underwater scene. Little stars, coral, seashells, a sparkly sea star, and a little blue fish complete this scene. I reinforced the photo corners with chipboard for added dimension.

On the opposite page, a couple of waves hold the picture mat, and a little yellow sunfish jumps in for fun! The background is full of adorable whales!


This page is tagged with a little sentiment for fun, and holding it all together is a big beach ball! 

Here I created a scene with a lighthouse that appears to be lit from the inside, The wave splashes with a glimmer, and the dolphin rides along with two stars...

This page is titled : Our bundle of joy. To allow for perfect picture placement, the mats are held with washi tape until mom decides which picture will stay on the pages.


This page holds a pocket filled with two tags, decorated to match, and it also has a collection of shells, orange gems, and LOTS of dimension. Stickers and dies were used to complete little aquatic scenes.

Here I used a lovely corner die with swirly waves, topped with iridescent seahorses and shells. The waves will hold strong, as they are backed with acetate to form a pocket, and the umbrella on the added tag is also made with lots of sparkle!

On this half-page I created a crabby scene, and also added a ribbon pull to allow for easier flipping of pages. It is also magnetic, and it's titled: Baby Boy...

This serene scene holds a darling photo mat with tiny footprints and the tuck spot has a sweet jelly fish and matching seashells.


On this side, the little octopus collage is held by a matching piece of twine,  and a vellum tag onto the side of the page, adorned by a cluster of shells...


This helm wheel has a sparkly sentiment I embossed onto vellum. It reads: Moments to Remember...


Here a little turtle hides behind a wave on yet another tag. The smaller tag on the page holds the tiniest little lighthouse. I adore little details!!

First mate is the title of this page, which reminds me of a late sunset, and little crabs along the shoreline...

For more fun, I made another page with a large beach umbrella, and created this scene with stickers from the paper collection. I used Splash by Bella Road for Echo Park.

Lastly there is a two-page scene where you can relax on the beach on a towel, created by a wide ribbon, or the beach chair facing the bright sun. On the opposite page is a small whale with a message that reads the beautiful Psalm 139:9-10.


This completes my mini album. I hope that you have been inspired to capture your own story in a book!

May you Be inspired, Be Blessed!- Raquel

For a video version: