Showing posts with label Quick and Easy Tutorials. Show all posts

Sweet Honey Bee With MFT Stamps

 Hi Crafters, 

Today I am so excited to be sharing with you my first entry into MFT's Weekly Sketch challenge number 583. I am using the Sweet Honey Bee stamp set, along with some of my favorite supplies. Below is an image gallery showing you part of my process. This adorable card was inspired by my husband, who happens to be a hobbyist beekeeper! Enjoy!


This is the Sketch for this week's challenge at MFT

Creative Process


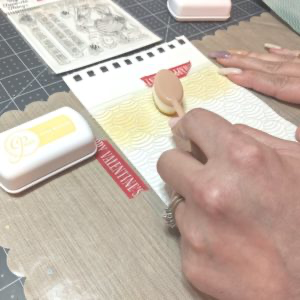
I began my card base with 110# cardstock. This was cut at 10"x7", scored in half at 5", to yield a 5"x7" card. The first panel was cut at 4.85"x6.85" out of designer paper in an ombré chevron pattern with a beautiful teal color that matched perfectly with my Catherine Pooler Skylight ink. This made my color choices super easy! Next, I used a trio of yellows from Catherine Pooler listed below for a perfect background panel, created with Honeybee's Stencil: Honey Dipper.


Here you can see how I used gradients of ink in yellow colors, using a soft brush. This allowed me to have a soft, but even application on this panel. Once complete, I cut it down to size to fit my card. ( 4.75"x6.75")


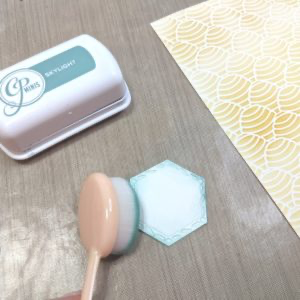
Following the same application style, I added Skylight ink on the edges of the Hexagons I cut using Tonic Studios dies. This really helped the embossing stand out on the edge of this beautiful shape! If you are wondering what I used, these hexagon shapes were cut using Tonic Studios 4126e Hopes In Hexagon Base Creator die set. This is a gorgeous set that leaves a beautiful embossed edge, with perfect areas to further embellish with Nuvo drops


I heat-embossed my image onto Vellum, and layered it onto the image I colored using inks and pencils. This technique will be taught in a future post, but it's one that I love to use because it gives a soft finish to the image color, while also allowing it to shine. Lastly, her little shoes, flowers, and antennae all got a touch of Nuvo drops for a dewy finish. Nuvo is self-leveling, so it is perfect for the little areas you wish to add dimension to with a bubble-like effect. 

"Secret Garden" DT project for Reneabouquets

Hi friends, 
I'm enjoying spring, and finally getting into my garden to enjoy the gorgeous colors and sounds! Today, I am bringing you a mini album covered in all of the beauty that we can encounter in a Secret Garden...
On the cover...
From the very top of the cover, you can see a nest full of adorable singing birds. They are nestled in a grouping of flowers that drape onto the page. Below them are a stunning Dragonfly, and floating butterflies that I suspended with floral wire. These quite literally float on the page!

Front and center is our Dahlia Flower girl. She inhabits this garden among the mulberry flowers, covered in sparkle and moonstones. Behind her are layers of paper altered with glimmer and delicate lace. Peeking from one corner is also a small beautiful board butterfly...

Dimensions: 8"x 6.5"x 3.5"
Papers: Summer Studio

 A closer look reveals the delicate beauty of this Dahlia Flower Girl and My Romantic Heart Butterfly. This is suspended with floral wire for some added whimsy. The lilac Mulberry Rose is also topped with a Butterfly Kisses Spun Lavender Single Side Printed Butterfly. I also fussy cut images from the Sweet Sentiment paper collection to include more floral arrangements in this book.


Take a peek at the adorable Printed Beautiful Board Large Bird Nest Laser Cut Chipboard. Can't you just hear them singing? You can also see how I've added dimension and layers with more fairies peeking in the background, glistening hearts that float on the page, and touches of light with pearls, gems, moonstones and Nuvo drops.


 On the spine of this book, I took the opportunity to display the Flower Crown Lace that drapes beautifully with its delicate peaks, and topped it with one of the pieces from the
Beautiful Board Large Dainty Butterfly Pattern. These have been altered with Nuvo Alcohol markers, cotton candy flat back pearls, and sequins.

Hand-painted papers are fun to incorporate into my projects! 

 The interior pages of this mini album continue the secret garden theme with each page displaying doors that open to reveal pictures. Each embellished with White Wide Floral Embroidered Lace, adorable magical hummingbirds, and pockets filled with vellum tags. The first page hosts a dancing ballerina, topped with a Romantic Heart Butterfly...

I used several Tonic Studios dies from my collection. All ephemera is fussy cut using my Tonic Scissors.

Gawdie Girl Pink Chunky German Glitter Glass, I was able to make a glimmery nest for my magical hummingbird on this page. The delicate pieces of lace are shown here in Ivory...

All pages are decorated with Tonic Studios Nuvo Drops.

The Cathedral Elements Laser Cut Chipboard  can also be used as-is. Here I only topped it with Cotton Candy pearls, and a gorgeous ballerina fairy from the paper collection...
For a delicate touch on the opposing page, I added more Cotton Candy Pearls.

I made each page slightly different layering Vellum in soft pastel hues.

This page has a delicate vellum-layered pocket. To keep the items soft, I layered the Wide Floral Embroidered lace with moonstones and more images from the collection...

Using my pastel Prima Watercolors, I managed to paint each page to match!

All of the pages are cohesive, and here you can get a glimpse at the last page, that also has a piece of the Beautiful Board, sprinkled with Pale Pink Glass Microbeads. Each piece can be altered to suit your fancy, which makes them easy to incorporate into any project! 

Frame topped with Cotton Candy Pearls.

On the last page, you can closely see that I have dry embossed all of the base pages in this book with a floral pattern for added texture. This final page has a hidden door to reveal three revolving doilies, and its door couples more butterflies and a magical hummingbird. All of these pieces will help tell a wonderful story. 

A 3D Embossing folder was used in making my pages more luxurious.
I hope that you enjoy this post, and that you view the added video for a more detailed walk-through.
As always, I hope that you can Be inspired, Be Blessed!
~Raquel

Video:


Here's my latest project!

Boots & Bouquets, TCK#74

Hello friends, Today is reveal day for Tonic's craft kit: Boots & Bouquets. This is easily the greatest value available for exclusiv...